Talent in Studio

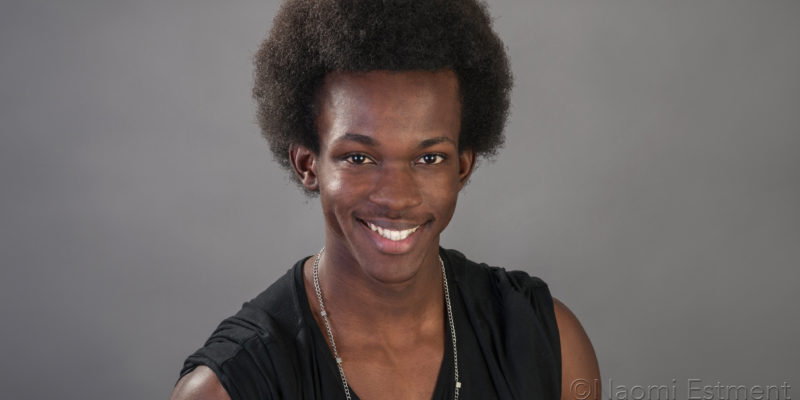
There’s a special buzz here at OV&P when we have talented people in our studio – an excited sense of knowing that they will go far in their lives and achieve significant things. This is the feeling that I had recently, while photographing Daliso Masongo (pictured above and below), and also his sister Mwila Masongo a few weeks earlier.

Mwila scooped 3rd place in the Commercial Model of the Year category at the IMTA (International Modeling and Talent Association) convention in New York last month, on the basis of the modeling portfolio that I shot for her. To view some of the gorgeous images from her photo shoot, follow this link to my Facebook album: Mwila Masongo in Studio.

Daliso is currently a sports management student, in addition to being a model at Ice Models Johannesburg. He has a flair for acting too, which contributed great fun to his shoot. It was a treat to work with him (and have some help from Mwila who was in studio as well), as we planned how to combine outfits, backdrops, props and poses for his portfolio.

Daliso Masongo's Portfolio by Naomi Estment

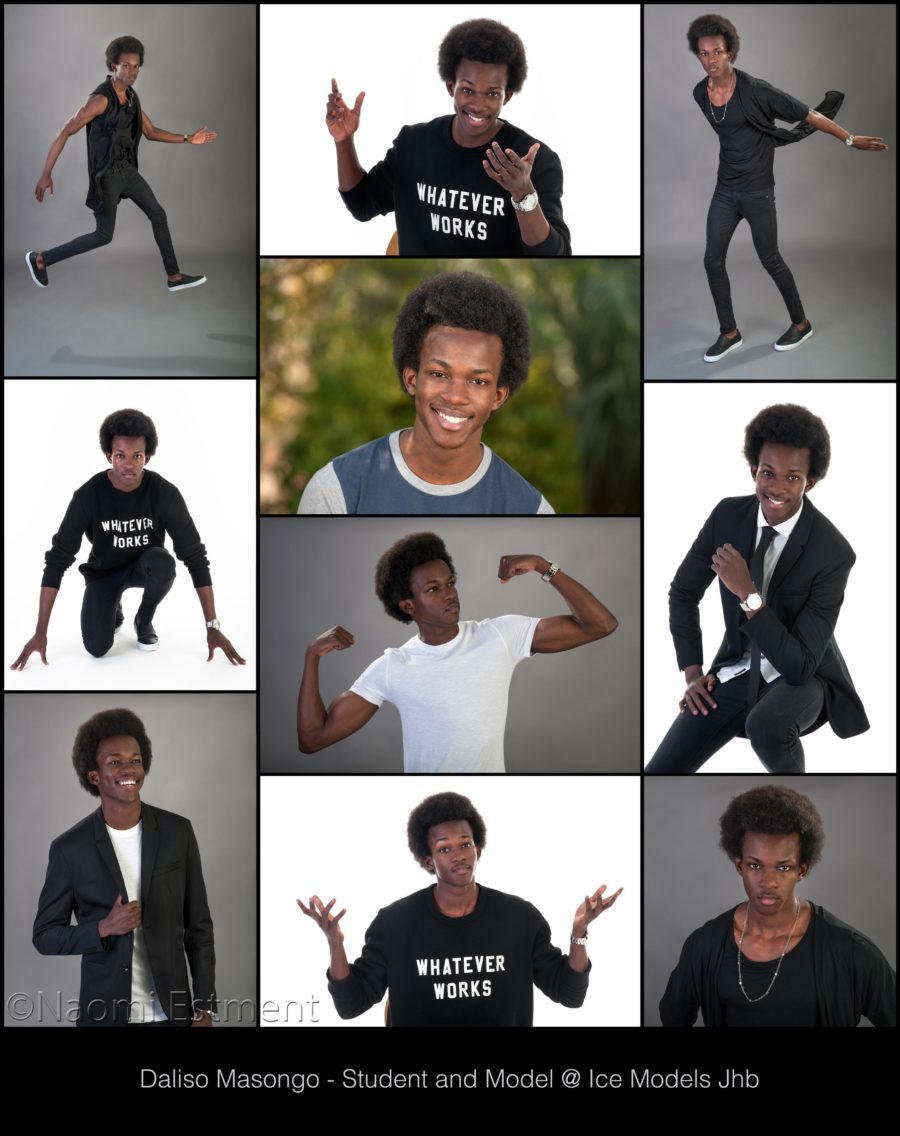
Exceptionally tall and athletic, Daliso had some great ideas of his own, including action shots such as his leap into the air that you can see above. He put me through my paces, not only while shooting his photographs but also with regard to editing them afterwards because he jumped so high that his head was above the top of our backdrop!

All in all, we aimed to capture Daliso’s vibrant personality, as well as his model looks, and to include versatility in terms of expressions, postures, style and mood. For this reason, we also shot some photos outside, capturing a completely different atmosphere to the studio shots. The selection of images featured above share a sample of this. What do you think? Did we succeed in achieving our objective? We think so, but would love to know your feedback, so please leave a comment below to let us know 🙂 Thank you!

Playing at Kruger Park

What do you like to do with overseas visitors? We love to enjoy African wildlife together. So when our Swiss cousin Kevin recently popped out to SA with his family for a holiday, Naomi and I arranged a trip to Ngwenya Lodge at the Kruger National Park.

I deliberately took along only the essentials to take a couple of pics and probably no video. Yeah, right 😉 Kevin’s wife Anne had earned a reputation for finding big cats on her first trip to SA, when we saw 4 different Leopard sightings in 3 days! That was also at Kruger, many years ago, and if you know anything about the bush, you’ll know it’s incredibly rare. 2017 was right up there.

Anne was on form, and the family saw the Big Five in no time at all, including leopard. As we relaxed and shifted from Joburg mode into Bush mode, the trigger finger started itching and I really enjoyed shooting the wildlife we came across. A highlight was two Tawny Eagles (pictured above) battling it out in the sky overhead, which is tricky to capture because everything happens so fast.

I made the beginners mistake of not checking that I had spare batteries with me, assuming they would be in the camera bag. Wrong! They had been left behind on the desk in my studio. Plan B. Battery flat, great shots in the bag, so I capitulated and took one of our video cameras on the last evening/night drive just in case we saw anything special. Wow, we were spoilt for choice.

A pack of hyena hunting, hyena cubs in and around their den and lions mating right next to the game vehicles got our full attention. It was fun to see the reactions of the children and some Spanish folk we had met. They could barely believe their luck, but then I pointed out that we had “Annie find the Predators” with us, which contributed to much laughter and animated story telling.

To see some more photos, view our FB album: Kruger Park – July 2017, and here’s a short video of exciting highlights:

Early the next morning Naomi and I hit the road back to the ‘Big Smoke’ to do a shoot that we’d scheduled, leaving our cousins to enjoy a few more days in the bush. In true style, Anne spotted a leopard which posed proudly, allowing Kevin a chance to get some lovely pics of this magnificent, elusive predator for their holiday album. Pity we missed it, but there’s always a next time.

This trip reminded me of how important it is to get away sometimes with family and friends to places that feed the soul and allow us to truly relax and appreciate nature. I hope you feel inspired to take a trip somewhere special with your loved ones and recharge your batteries. Oh, on that note, don’t forget to take spare batteries for your cameras 😉

Aerial Image of Sandton by Dave Estment of OV&P

Night Photography – Not Always Easy

We’re often asked to do low-light or night photography, either in the bush, close to nature and the stars, or when our property development clients want to showcase their architectural creations, for example. The images above and below are classic examples of low-light photography, the first using a 3 Axis gimbal to stabilise the camera on an aerial drone and the second using a tripod.

The first thing that tends to pop into people’s minds when talking about night or low-light photography is that it’s difficult because the shutter speed, aperture and ISO settings are dramatically compromised due to the reduced available light. This can easily result in blurred images because of camera shake and not having enough shutter speed. In some ways they’re right, because it doesn’t matter how technically correct the image may be – if it’s blurred, it’s useless. Period.

Key Camera Settings

So, how do we produce perfectly exposed, pin-sharp images in near darkness? First, we need to stabilise the camera so that it stays rock steady while the shutter is open, sometimes for up to 30 seconds or longer. One of my golden rules when doing low-light photography is to use the lowest possible ISO setting, as this will minimise the graininess of the image. So if your camera has a low ISO setting of 100 and a high ISO setting of say 6400, ALWAYS choose 100 as your default when possible.

The second factor to consider is the depth of field you want to achieve in the shot. The larger the aperture, the shallower the depth of field, but the more light is allowed onto the sensor. What if you want a deeper depth of field where everything appears to be in focus? Simple. Use the aperture setting that will give you the depth of field you require. Then let the last setting that you need to consider compensate for the lack of available light, while ensuring correct exposure and depth of field. What’s this last setting? Shutter speed!

The Game Changer

Once you have stabilised the camera on a tripod or a three-axis gimbal in the case of a drone, you’re free to use the slowest necessary shutter speed to control how much light is allowed to reach the sensor. Stabilisation is the game changer. In general, it’s the answer to the problem, but there is another factor that creeps into the equation. What if you have areas of the image that are brighter than other areas, like a brightly lit lounge or bedroom in a house that is otherwise pretty dark by comparison?

Night Photography of Home by Dave Estment of OV&P

The Golden Rule

The golden rule here is to expose correctly for the brighter areas, because if you overexpose these, you will completely “blow” them, leaving no information there to “pull back” in post production. When you correctly expose the brighter areas of the image, which will in turn underexpose the darker areas, there is still a much better chance of brightening the darker areas in post production (since these tend to contain more information), provided they are not completely black.

The Next Level

It helps to use artificial light like a speed-light or studio lights to balance the available light in the darker areas of the image. This is where it can get tricky, and it’s probably a good idea to call in a pro in situations like this 🙂 The same principles apply whether you’re in the bush or in the “Big Smoke”. It does take more planning and time to execute a correctly exposed, pin-sharp low–light photograph, but if you use these guidelines, I’m sure you’ll be thrilled with the results.

Please feel free to contact us for your low-light projects and any other video and photographic requirements that may call for more experience. In the meantime, SHOOT SHARP.